
COMETCON
NOV 8, 2025
The Real Impact of Encryption on Cloud Backup Speed
Discover how AI-driven forecasting in Comet Backup helps MSPs prevent data loss before it happens.
A good Proxmox backup strategy starts by deciding which VMs should be restored first, how often they should be backed up, and where those backups should be stored.
With Comet Backup, you can build that plan around Proxmox VE workloads, flexible storage, and fast restore paths.
Comet Backup gives MSPs and IT teams a direct way to manage Proxmox VE backups inside their existing backup workflow. It connects to your Proxmox VE cluster, so you can choose the VMs, containers, nodes, and disks that need protection.
Here’s where it helps most:
To design a robust Proxmox VE backup strategy with Comet Backup, follow these steps:
Ensure you are running Proxmox VE 8.x or higher and that the Comet Backup Agent is installed within the same network as your target Proxmox cluster.
Open the Comet Backup desktop application, click on Protected Items, select + Add Protected Item:
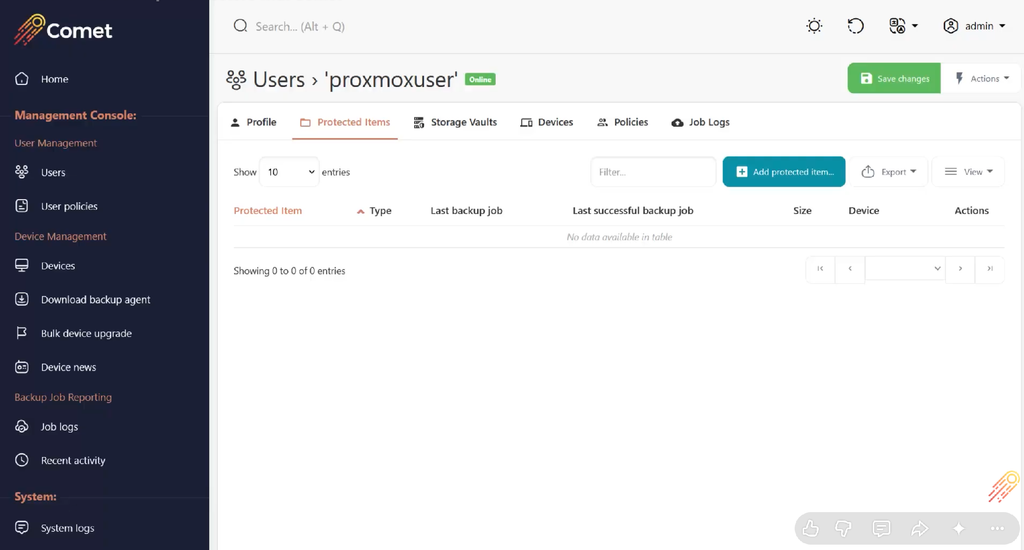
Source – Alt text: Protected Items within Comet Backup Management Console
You’ll see a list of backup types you can select with Comet Backup. Choose Proxmox from the list, rename it as needed, and click next.
Enter your Proxmox cluster credentials, click Test Connection, and then click Next:
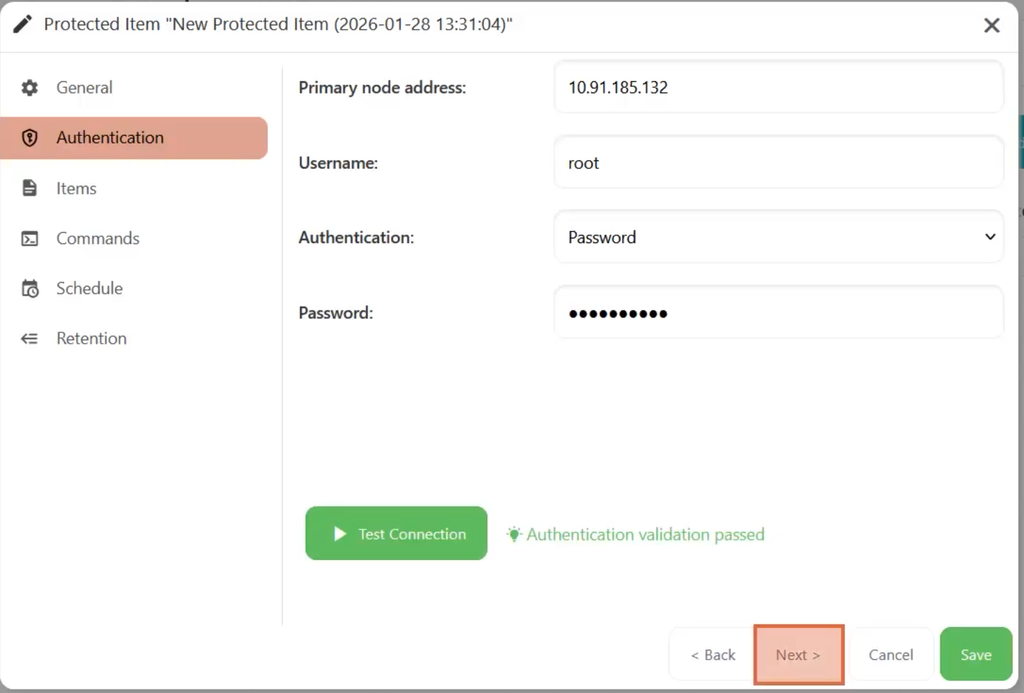
Source – Alt text: Proxmox Cluster Credentials Test Connection in Comet Backup
Use the built-in picker to choose whether to protect all virtual machines/containers in the cluster, a single node, or even individual virtual machines and disks:
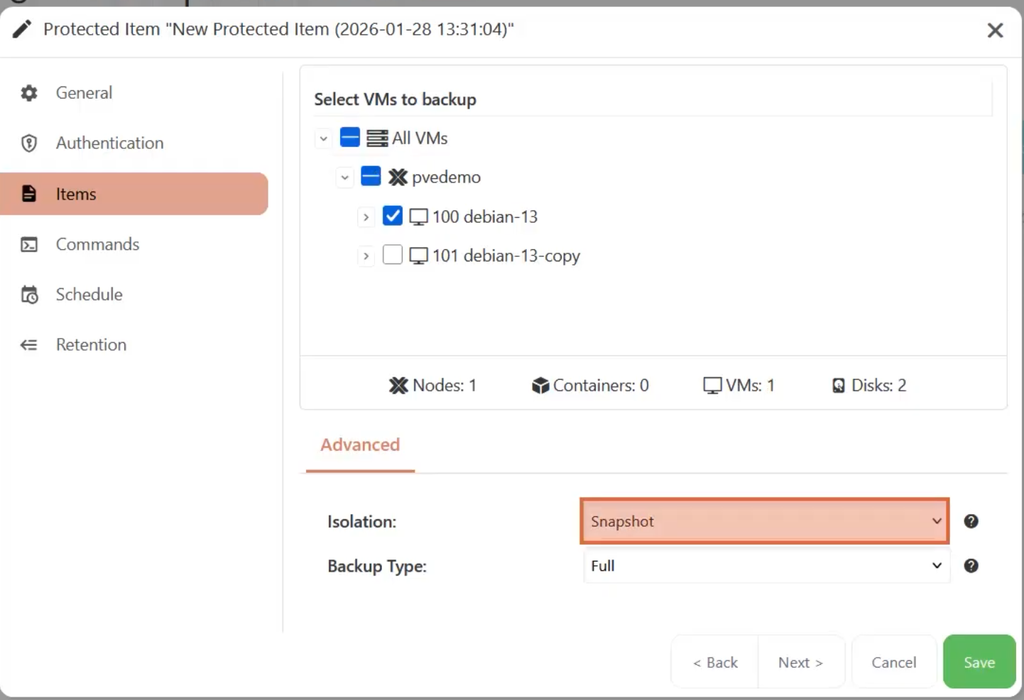
Source – Alt text – Machine Backup Options You Can Choose From
When setting up your Proxmox backup, you can choose from multiple isolation modes, which determines how the container is handled during the backup process:
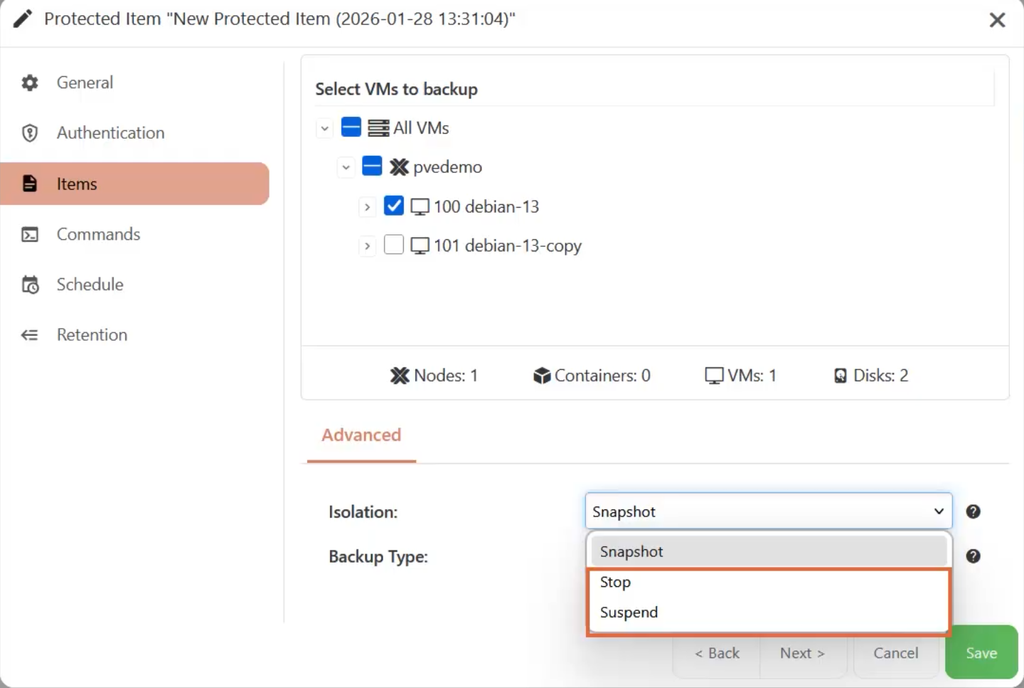
Source – Alt text – Isolation Modes: Snapshot, Stop, and Suspend
Pro tip: Default Snapshot mode is usually the best starting point when the container sits on storage that supports snapshots. Stop and Suspend are also available when you need the container handled differently during the backup job.
You get the option to choose two backup types –
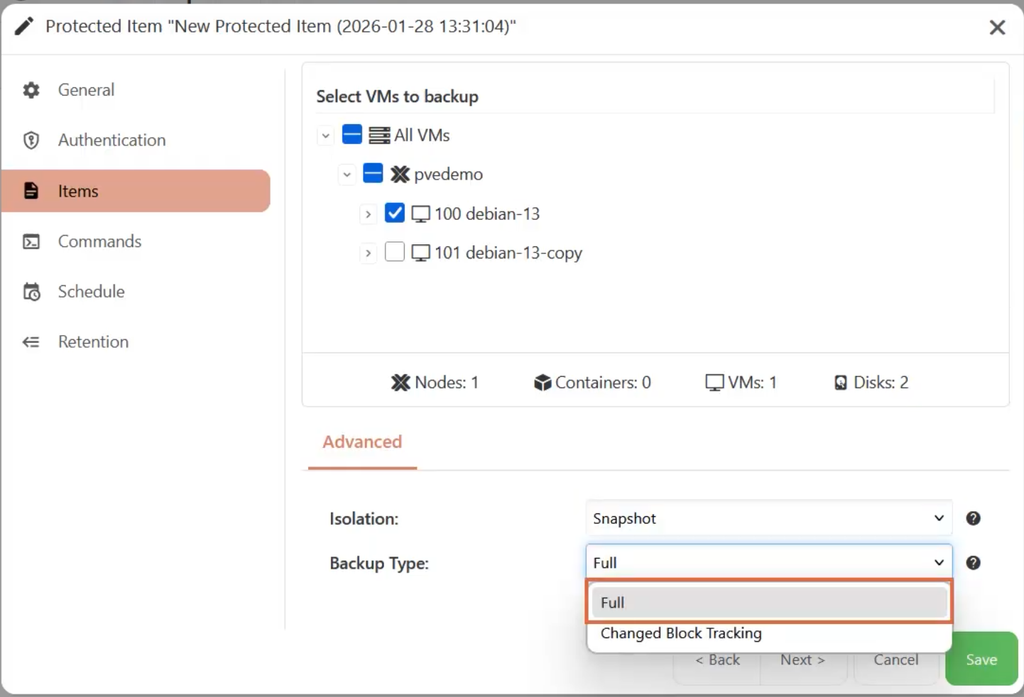
Source – Alt-text: Backup Type Options within Comet Backup Console
Once done, head over to the Schedule tab and click on the + sign to add a backup schedule:
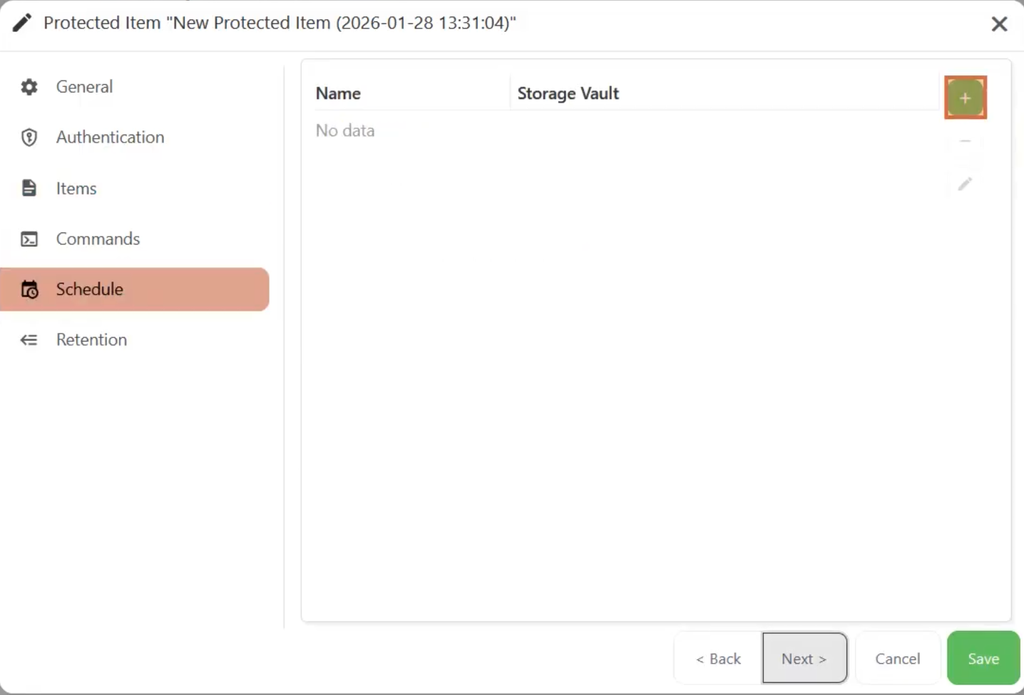
Source – Alt text: Schedule a Backup Process
You can configure multiple backup schedules as needed with the common schedule types being daily, weekly, monthly, and so on:
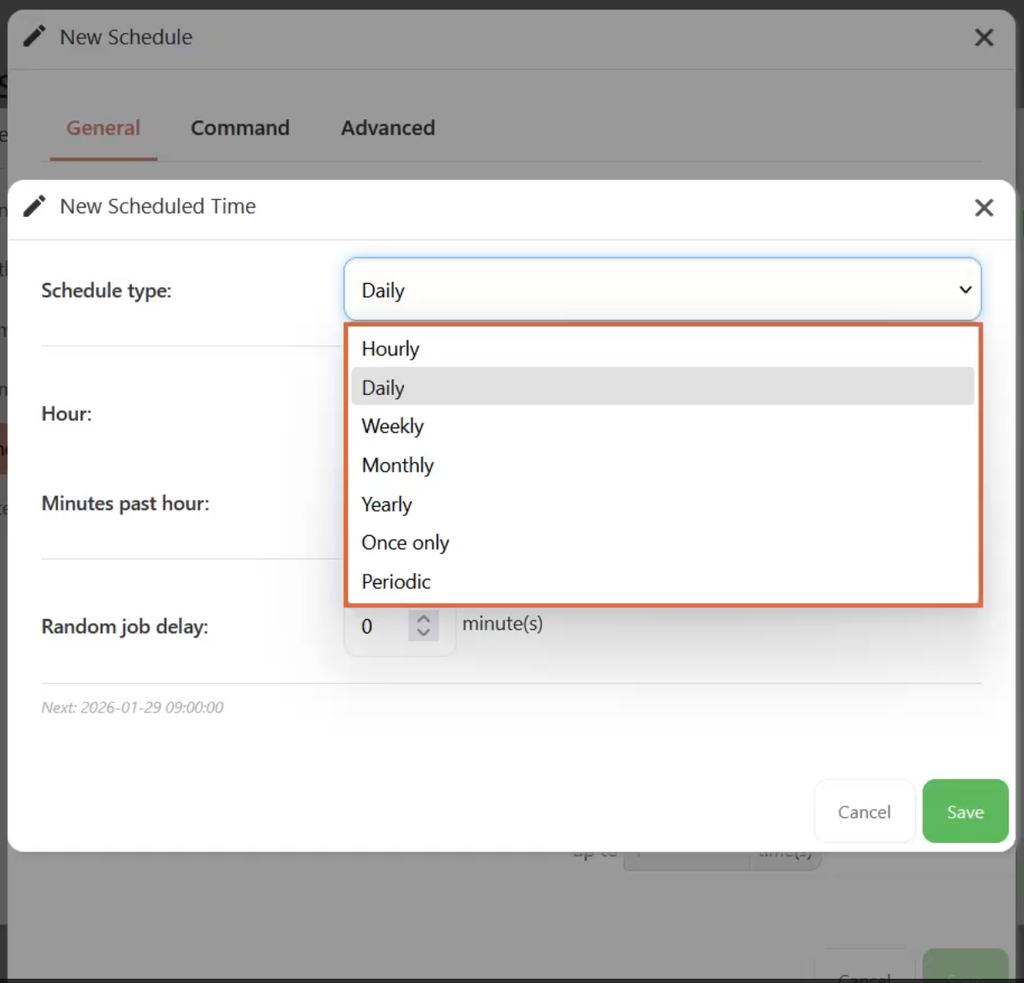
Source – Alt text: Scheduling Options Available
Pro tip: Don’t forget to select the Storage Vault where your backups will be stored. Click Save and you’re done!
Once your Proxmox Protected Item is configured, the real win is keeping the setup clean, predictable, and easy to restore from.
Comet Backup gives you the controls, but the strategy still needs a bit of admin discipline. Here are a few backup best practices to keep in mind:
Does Changed Block Tracking help Proxmox VE backups run faster?
Surely. After the first successful job, Comet Backup reads only the disk blocks that changed. This keeps backup windows tighter, reduces unnecessary data movement, and makes your storage shift much easier.
Where should I install the Comet Backup Agent for Proxmox VE?
Install the Comet Backup Agent as a VM on the same Proxmox cluster or host you are protecting to keep backup traffic close to the source, reduce extra network hops, and give Proxmox backup jobs a cleaner path to run.
Can Comet Backup restore one file from a Proxmox VM backup?
Comet Backup can browse image-based Proxmox VM backups and restore individual files or folders from inside the disk image. Meaning, you can recover the file someone needs without restoring the whole VM.
How does Comet Backup protect Proxmox backup data?
Comet Backup encrypts the backup on the client before it leaves the client. By the time your Proxmox VM data reaches cloud, off-site, or provider-managed storage, it is already encrypted with AES-256-CTR.
Are Proxmox snapshots enough for backup?
Proxmox snapshots are useful for quick rollback, but they are not a full backup plan. A proper strategy needs separate storage, retention rules, and tested restores.
Discover how AI-driven forecasting in Comet Backup helps MSPs prevent data loss before it happens.
Discover how AI-driven forecasting in Comet Backup helps MSPs prevent data loss before it happens.

Discover how AI-driven forecasting in Comet Backup helps MSPs prevent data loss before it happens.
Discover how AI-driven forecasting in Comet Backup helps MSPs prevent data loss before it happens.
Discover how AI-driven forecasting in Comet Backup helps MSPs prevent data loss before it happens.
Discover how AI-driven forecasting in Comet Backup helps MSPs prevent data loss before it happens.